Product Background Remover for Shop, Marketplace and Catalog Photos
Professional product background remover for product images with batch processing and AI.
Between a finished product shot and a usable shop image there is often one more step. The background has to disappear without losing parts of the item. With this product background remover you can cut out product photos and handle such jobs as an image series. Instead of opening every shot one by one, you put together a list and start the calculation. The cut-out subjects then appear as new files in the output folder. The program concentrates on this one task. It is aimed at retailers, photo studios and catalog designers who prepare item images regularly and do not want to operate a full photo editor for it. The sections below show which settings affect the cutout and what matters when you check the results.
Download the AI tool for product background removal for free and start with a few shots from your range.

Along with a simple item, add a photo with narrow parts or fine material edges. On your own images you then see how the automatic separation turns out before you process a larger stock. People who type "remove background product" into a search engine usually have exactly this chore: many images, one clean look.
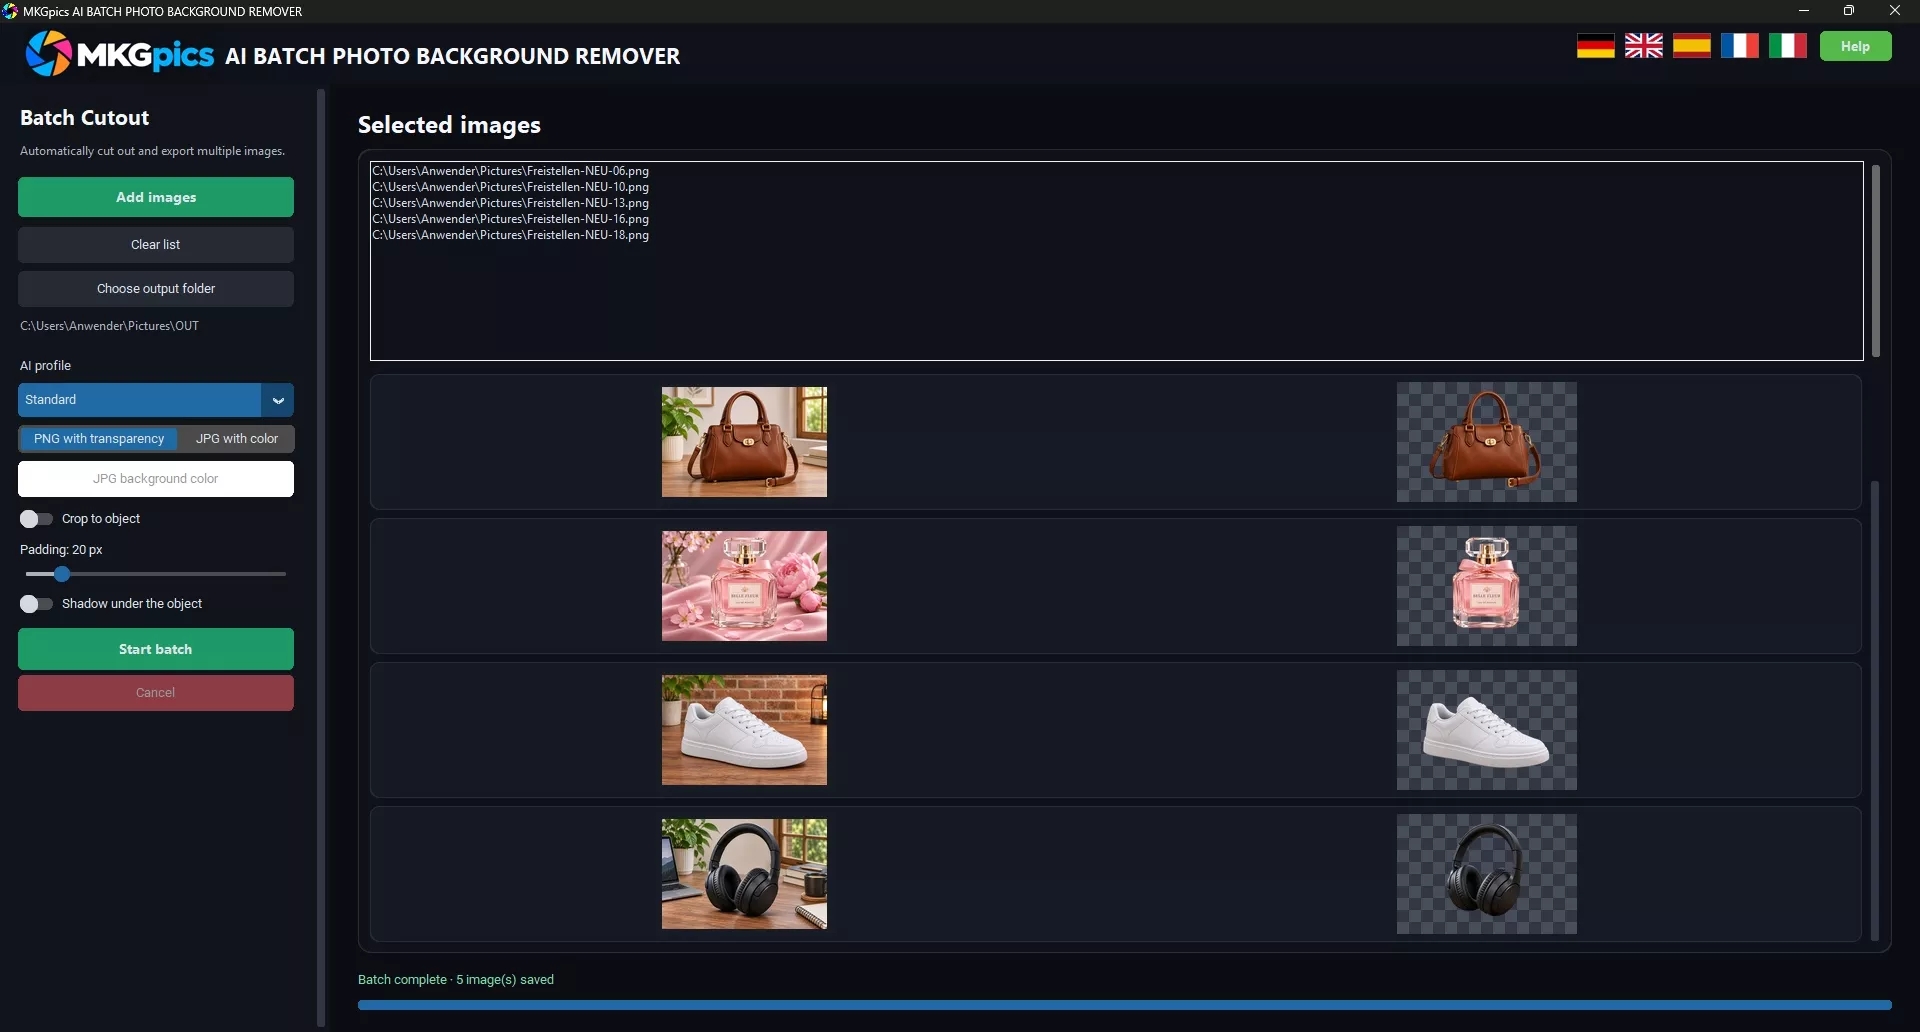
Product background remover with image list, target folder and preview for whole folders.
- Automatic subject separation for single product shots and image series
- Optional shadow behind the products
- Loading a complete image folder after picking one image in it
- Batch processing of all loaded files in one run
- Three AI profiles for general subjects, fine structures and firm contours
- Detail profile for hair, fur, fringes and thin material ends
- Alpha matting to refine partly transparent edge pixels
- Optional object crop to remove empty image area
- Subject margin adjustable from 0 to 150 pixels
- 20 pixels of margin as the default for the crop
- Original image dimensions kept when the object crop is switched off
- Saving as PNG with a transparent background
- JPG export with a freely chosen background color
- White background area as the JPG default for a white product background
- Product shot white background output without any extra editing step
- Reading PNG, JPG, JPEG, WebP and BMP
- Side-by-side view of the original shot and the finished cutout
- Progress bar with counter for the running job
- Marking of the file currently being processed in the image list
- Resetting the selection and loading a new series while no run is active
- Stopping the job after the photo currently in progress is finished
- Already saved outputs kept after a cancel
- Remaining shots processed when single files fail
- Summary of unprocessed images in the final report
- Separate locations for source files and results
- File name suffix _freigestellt for matching results to originals
- Button to open the results folder
- Calculation with locally installed Python AI libraries
- Photos processed on the own PC without cloud upload
- Offline operation with the locally available AI components
- Program language German, English, Spanish, French or Italian
- Use under Windows 10 and Windows 11
- Free download without a subscription and without ongoing AI costs

Before and after product background removal with the batch processing of the AI program.
Product Photography White Background for a Consistent Shop Look
In a product overview, many shots stand directly next to each other. Differences in image composition stand out there more than in a single large view. Cutting out the subject removes distracting shooting surroundings from that overview, and a white product background is the most common way to make a range look uniform. Your template remains decisive for the rest of the visual language. Photograph comparable items from similar angles and at a comparable camera distance. A shoe shot from the side and a shot from above look different even after the cutout. With product photography white background work, you should therefore separate background removal from image design. The AI program handles the separation of the subject; perspective and lighting come from the original photo. A well-prepared shooting series saves later attempts to even out these differences with a crop or a background color.
Transparent Backgrounds or a Matching Background Color
The background color affects how clearly an item stands out from its surface. Dark devices are usually easy to recognize on a light surface. With white ceramics, the same background can make the outer shape harder to read. In that case compare white with a restrained gray, if your sales channel allows the choice. Colorful backgrounds also deserve a second look, since a strong tone can change how textiles or lacquered surfaces are perceived. Marketplaces mostly ask for a product photo white background, so the white default of the JPG export is a sound starting point. In the AI program you choose the JPG background color before the job. Decide on a representative shot and look at it later next to other items of the same category. That way you judge the color in the context of your range.
Product Cutouts for Online Shops, Banners and Print Layouts
An online shop needs different output than a printed brochure. On the product page the item should be easy to read; in an ad it may need extra room for a price or a campaign line. Product cutouts can be reused for this in a layout application. Keep a sufficiently large version before you create smaller web variants, because a file that has already been reduced holds less detail for later print jobs. Thin struts or fine fibers must also suit the planned display size. What is clearly visible on a large screen can vanish on a small label. Match the later use to the size of your original shots.
Product Background Removal with AI and Batch Processing
A batch job transfers the same settings to a whole image list. That helps when the shots share similar requirements. A series of matte packaging is easier to judge in one run than a mixed folder with jewelry, plush toys and glass. For product background removal it therefore pays to separate by material and shooting conditions, so you do not have to search a problematic subset among results that already fit. As a product image background remover, the AI software calculates the files one after another. The time needed depends, among other things, on the image dimensions and the power of your computer. With a new stock, plan a small series first to estimate run time and result quality under your working conditions. Anyone who used to remove background from product image files by hand will notice the difference mainly on larger ranges.
Selecting Single Images or Processing Whole Folders
Preparation starts in your file storage. Sort out blurred photos, accidental duplicates and unneeded perspectives before you load the job. Item numbers and view codes in the file name make it easier to match files to the stock later. When a folder is loaded, the list uses natural number sorting, so a file numbered 2 comes before one numbered 10. That helps when comparing several views of one item. To remove background for products you can equally assemble a smaller selection, for example for newly arrived goods. As long as no run is active, the list can be cleared and refilled. Before you start, check that the selection contains the whole stock you want.
Choosing the Right AI Profile for Different Items
For the choice of profile, the nature of the subject counts more than its sales category. A bag can have firm outer edges, thin straps or a fur trim, and the task for subject detection differs accordingly. For ordinary shots, begin with the standard profile. For fibers and fringes, compare the variant for fine details; a further profile is available for firm outlines. With a product photo background remover, a difficult sample image says more than a shot with an easily recognizable outline. Check on it whether narrow parts are preserved and inner openings are left out. A suitable profile has to manage both. If the requirements conflict, process the affected groups of subjects in separate series.
Product Background Remover Step by Step for an Online Shop
The process starts with an idea of the finished image. First check the image requirements of your shop, then set up the output in the AI program. Load the prepared shots, select the profile you tested beforehand and enter the save location. After that you decide on file format and crop. For an online shop job, all details are then together before the start. When testing, change only one setting between two runs if possible, so a difference in the result can be traced. After the calculation, check the export at its later display size. Only then transfer the remaining item images into your publishing workflow.
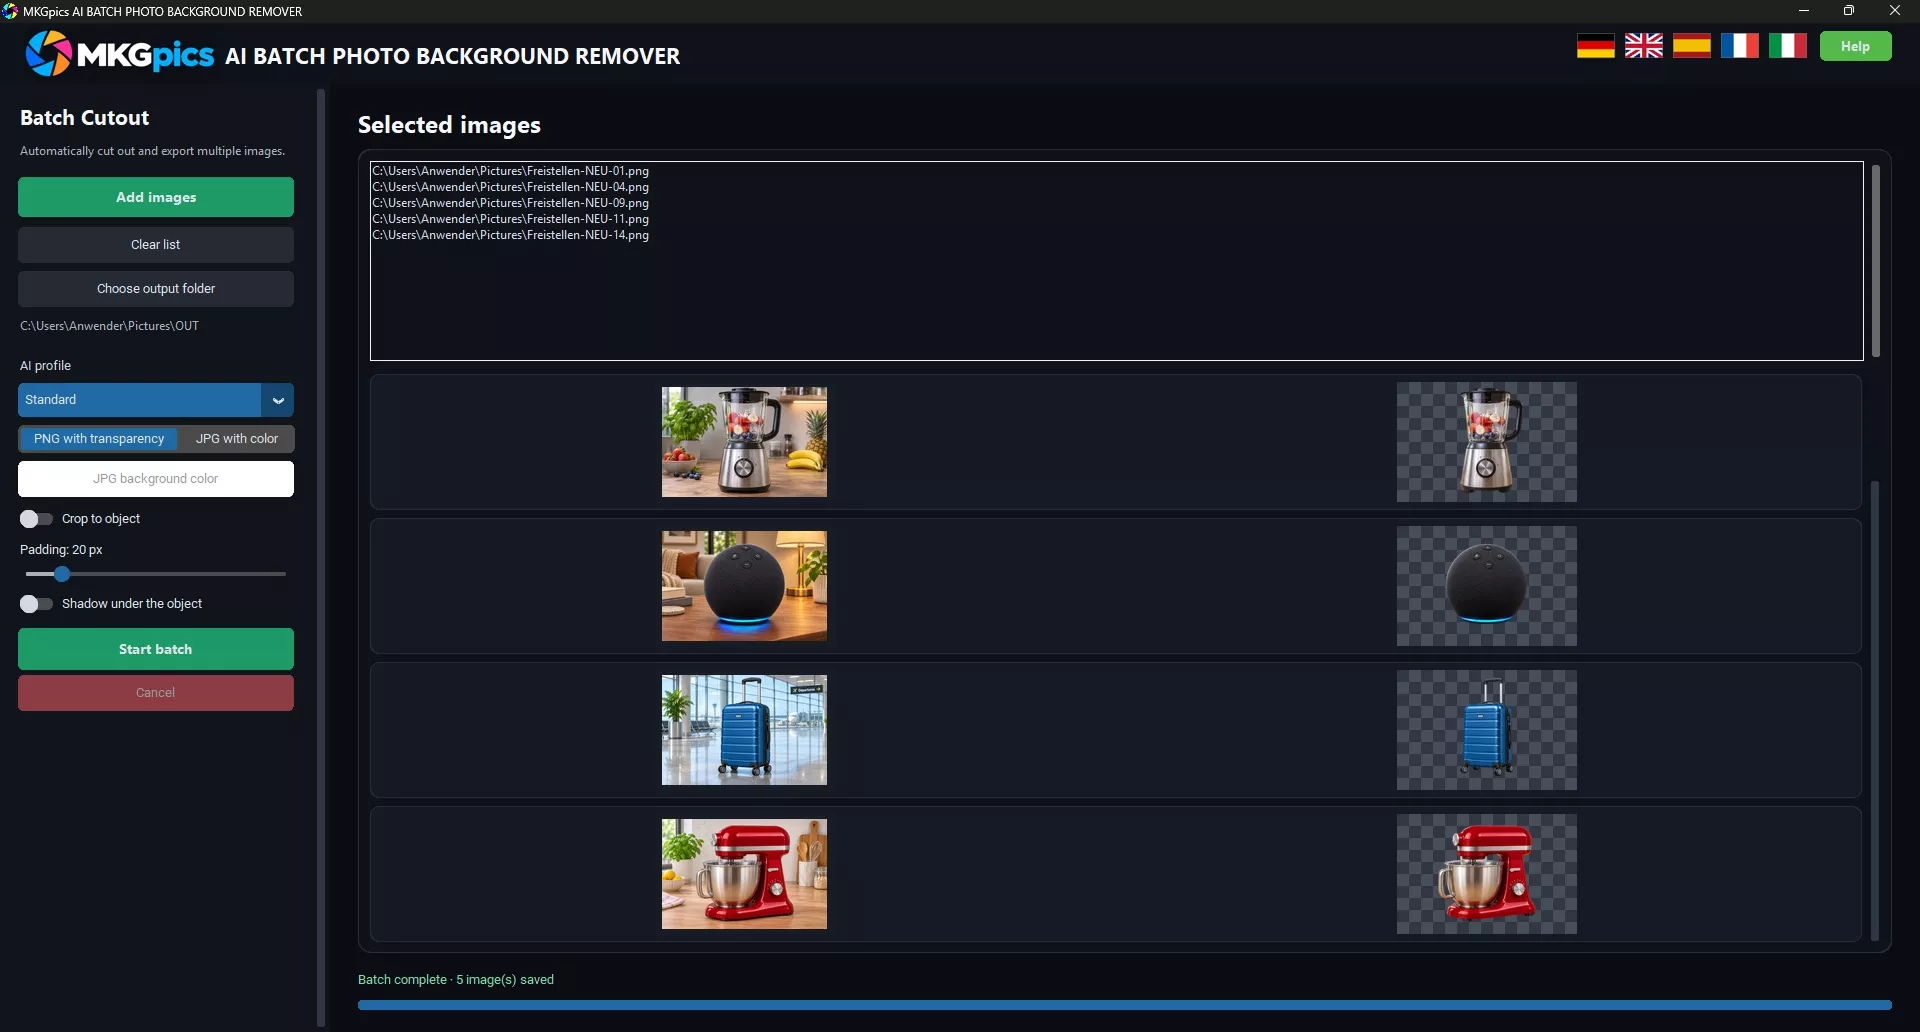
Batch settings with AI profile, output format and target folder for a product photo white background.
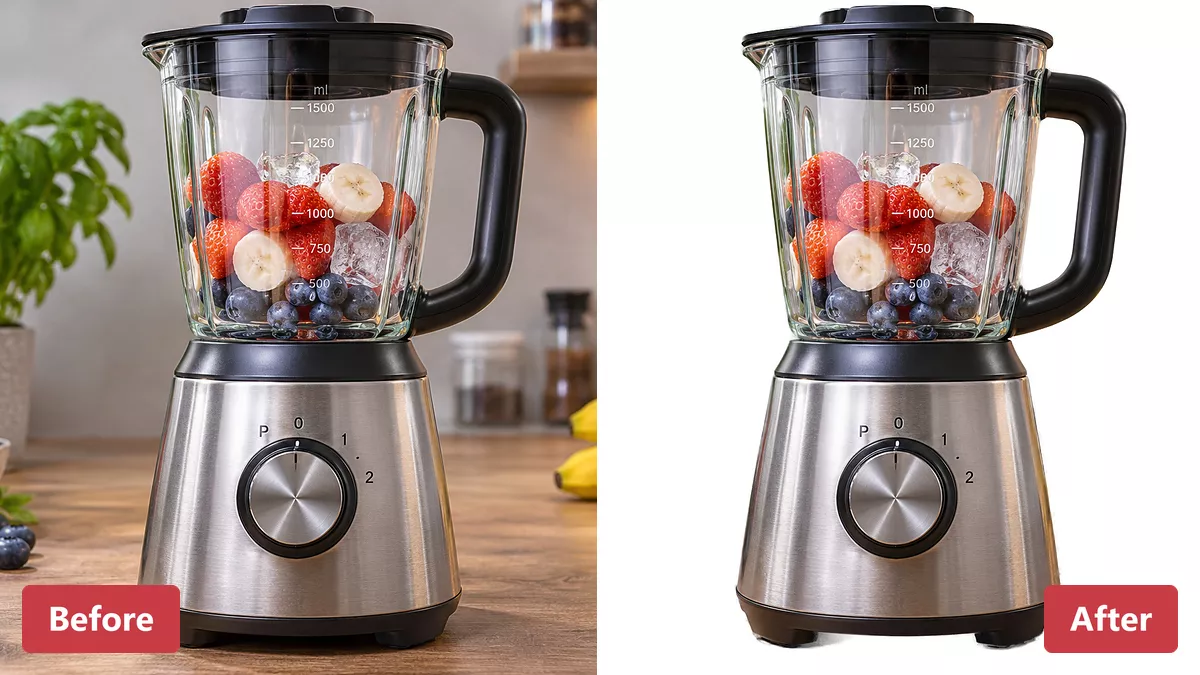
Product cutouts of a blender before and after the background removal.
- Load the prepared selection and check it for missing views
- Apply the AI profile you chose on the basis of a sample
- Enter the output format and a separate save folder
- Switch on the object crop if needed and set the distance to the subject
- Start the job and compare the first cutouts with their originals
- Look through the final report and the export files before further use
Setting the Output Format, Target Folder and Image Margin
With the object crop switched on, the AI software removes the empty area around the detected subject. The remaining distance is given in pixels. This value is not a percentage of the image area. Twenty pixels therefore look more generous on a small shot than on a photo several thousand pixels wide. For product background removal, judge the margin by the actual starting size. An identical value does not yet guarantee the same size share for all product images. Without the object crop, the output keeps its original dimensions. For the target folder, a name made of job, date and processing status is recommended. That keeps later exports apart without having to open every file or identify it by its thumbnail.
Checking the Results in the Preview
The preview places the original photo next to its finished cutout. Use this comparison first to check that the item is complete. Missing straps, cut-off tips or accidentally removed parts matter more than a small remnant on the outer edge. When lighting or perspective changes, also check shots from different parts of the list. The progress counter shows how far the job has come. If a setting does not fit, cancel stops after the image currently being calculated, and outputs saved up to then are kept. After the export, inspect fine contours in an enlarged view as well. A small preview image does not suffice to judge single edge pixels and narrow gaps.
Clean Contours and Suitable Image Crops
An automatic cutout can only work with the image information the shot contains. Overexposed outer areas and blurred parts make separation harder, because their borders are missing or run into each other in the photo. Reflective and translucent materials pose a further task. In a glass bottle the surroundings appear inside the subject; on metal they can be mirrored on the surface. With a product background remover, such image parts do not necessarily disappear with the outer background. The table therefore distinguishes between a program setting, a check point on the result and an improvement of the original shot. That shows whether another run makes sense or whether the photo itself needs different conditions.
| Product Group |
Setting or Approach |
Check Point on the Result |
Approach for the Shot |
| Folding boxes |
Use the profile for firm contours |
Complete corners and flaps |
Replace blurred originals |
| Knitwear |
Compare the detail profile |
Preserved fibers and fringes |
Choose a surface that differs in color |
| Leather bags |
Start with the standard profile |
Handle openings left clear |
Light dark straps sufficiently |
| Ceramic tableware |
Use firm outer shapes as the test subject |
Separation of white edges |
Try a gray shooting surface |
| Plush items |
Let fine structures be captured |
Natural run of the fur edge |
Avoid blown out edge areas |
| Jewelry |
Calculate a few demanding pieces in advance |
Gaps between chain links |
Make sure of high detail sharpness |
| Glass containers |
Judge see-through areas separately after the cutout |
Surroundings left inside the material |
Prepare a neutral shooting environment |
| Chrome fittings |
Test the contour profile |
Colored reflections inside the object |
Take disturbing objects out of the mirroring area |
| Wire baskets |
Look through the inner areas separately |
Background remnants between the meshes |
Create more distance to the back wall |
| Shoes |
Compare standard and contour profile |
Transition from sole to floor shadow |
Light the ground more evenly |
| Wooden furniture |
Check the object crop with margin |
Intact legs and narrow struts |
Avoid similar brown tones behind the goods |
| Transparent packaging |
Plan reworking of single spots |
Preserved see-through film areas |
Check reflections and creases before shooting |
Clipping Path or AI Cutout for Product Photos
In professional retouching, a clipping path is a vector outline drawn by hand around the subject. A product clipping path delivers razor sharp edges and is still the usual choice for hard goods such as boxes, devices and furniture. The cost is time, because every item needs its own outline. This is why people search for "clipping path remove background" when they have hundreds of shots. A batch run replaces much of the classic clipping path product work: the AI finds the outline, alpha matting softens the edge pixels, and you only review the results. Items with strict geometry, such as chrome fittings or glass, can still deserve a hand-drawn path afterwards.
Fine and Firm Subject Edges
At the edge of a subject, some pixels are neither fully foreground nor fully background. This applies, for example, to single fibers in front of a differently colored surface. Alpha matting calculates these transitions so that the cutout does not consist only of hard cut lines. For product cutouts, fidelity to the material is decisive. A carton needs a different contour than a wool hem. Too much smoothing can remove fine structures and change the shape artificially. Therefore view the result on a light and a dark test surface. Light fringes and dark background remnants stand out differently depending on the surroundings. If disturbing spots remain, the file needs additional edge work in an image editor before publication.
Saving as PNG with Transparency or JPG with a Custom Color
PNG stores an alpha channel for fully and partly transparent image areas. JPG does not have this property. When saving, the cut-out surroundings are replaced there by the chosen color. For the online shop need, the choice of format therefore depends on the later use. If the subject is to appear on different surfaces, PNG leaves more room for design. For a finished view on an unchanged background, JPG can be enough. The smaller file cannot be read off the format alone, as image content and compression play a part. Keep a high quality original version and derive the web sizes you need from it. Saving compressed JPG files repeatedly can cause additional image errors.
Frequently Asked Questions About the Product Background Remover
Before a large processing job, compare the export with the actual publishing route. A cut-out subject is not yet an assurance that all image requirements of a marketplace are met. You have to check requirements for dimensions, background and additional graphics with the sales channel in question. Upload a sample image first and see how the shop system displays it. An automatic conversion can change the file after export, so judge the uploaded version too, not only the result in the output folder. The questions below also cover taking over a folder, handling file errors and the terms of use that matter before a larger job.
Are the Original Images and Photos Kept on the PC?
Source files and results get separate save locations. The folder with the original shots is rejected as output target; the file name suffix _freigestellt helps with later matching. This separation protects the originals during processing but does not replace a backup against accidental deletion or a storage failure. Local calculation and local storage are also different questions. The AI program does not upload the shots for cutting out. An independently set up sync service can nevertheless transfer the chosen folder. For internal image stocks, therefore check the save path and the access rights that apply there. That way the processing fits how you handle your files, without relying on the way the application works alone.
Can I load a complete folder for product background removal?
Yes. After you pick one shot in a folder, the AI program can load the images of that folder into the list. The chosen processing then applies to this selection.
Which output suits a product shot white background in an online shop?
For changing layout surfaces, choose PNG with transparency. If the background is already fixed, save the finished view as JPG with the color you want, white being the default.
Does the computer have to be online while the product background remover works?
No. With the locally available AI components, the calculation runs offline. No internet connection is needed for this processing step.
Does a damaged shot stop the whole job?
Single file errors should not interrupt the rest of the processing. The final report names the shots that were not processed, so you can examine them separately.
Can the program replace a manual clipping path?
For many standard products, yes. The AI cutout takes over the outline work, and alpha matting refines the edge. Items with very complex edges, such as glass or chrome, may still need a hand-drawn path afterwards.
Are there subscription fees for using the product background remover?
No. The download is free. The described use works without a subscription and without ongoing AI costs.
|
